เอกสาร นี้อธิบายเกี่ยวกับการแก้ไขปัญหา Cisco Switch เกี่ยวกับการบูทไม่สำเร็จ เนื่องจาก system image เสียหาย ผิดผลาด ถูกลบ หรือมีการกำหนดค่าในการบูทผิด ซึ่งในเอกสารนี้ใช้ได้กับ switch รุ่น 2940, 2950/2955, 2970, 3550, 3560, 3750 and the 3750 Metro series switches.
กำหนดค่า PC สำหรับการ console
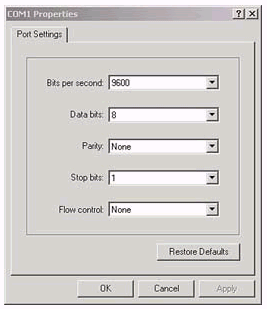
ใช้โปรแกรม HyperTerminal ของ Windows เพื่อสร้างการเชื่อมต่อ console session โดยกำหนดค่าดังนี้:- Bits per second: 9600
- Data bits: 8
- Parity: None
- Stop bits: 1
- Flow control: None
ปัญหาที่เกี่ยวข้องกับการบูทของ Switch
- switch มีการ reboot วน
- switch ไม่ได้แสดง prompt ปกติ (switch>) แต่แสดง switch:
- มีข้อความ error ขณะโหลด flash:
Switch แสดงข้อความ Switch: Prompt or "Error Loading Flash:"
- เมื่อขึ้น switch: prompt แสดงถึงการบูทไม่สมบูรณ์ ต้องมีการทำให้ขั้นตอนการบูทสมบูรณ์้
- เมื่อมีข้อความ error loading flash:<image> message แสดงว่า ไม่สามารถโหลด image ได้เนื่องจาก ไฟล์เสียหายหรือถูกลบไป
- อาการไฟล์เสียหายหรือไม่สมบูรณ์อาจเกิดจากตอนดาวโหลดไฟล์มีความผิดพลาด อาจเป็นตอน upgrade หรืออาจมีใครเข้าไปลบไฟล์ที่ flash
Error loading "flash:c2950-i6q4l2-mz.121-12c.EA1.bin"
Normally, the switch attempts to automatically boot the next valid image in the Flash file system. Here is an example:
Error loading "flash:c2950-i6q4l2-mz.121-12c.EA1.bin"
Interrupt within 5 seconds to abort boot process.
Loading "flash:/c2950-i6q4l2-mz.121-13.EA1.bin"...######
########################################################
!--- Output suppressed.
ขั้นตอนการแก้ไข
เมื่อ PC มีการเชื่อมต่อกับ Switch ผ่านโปรแกรม Hyperterminal แล้ว- ถอดปลั๊ก power ออก
- กดปุ่ม MODE ที่ด้านหน้าของ switch ค้างไว้ แล้วเสียบปลั๊ก
- ถ้าเป็นรุ่น Catalyst 2940 และ 2950 รอจนไฟ STAT ดับ แล้วจึงปล่อยปุ่ม MODE
- Catalyst 2940 and 2950 series switches

- ถ้าเป็นรุ่น Catalyst 2970, 3550,3560 และั 3750 Series รอจนไฟ LED ของ 1x (อยู่บนพอร์ตที่) ดับลง จึงปล่อยปุ่ม MODE
- Catalyst 2970, 3550, 3560 and 3750 series switches
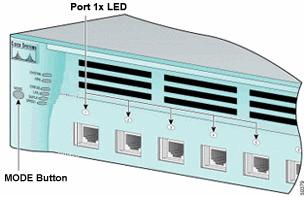
- ถ้าเป็น switch รุ่น 2955 ให้กดปุ่ม Ctrl+Break
จากนั้น prompt ของ Swithc จะขึ้น switch:
- ใช้คำสั่ง flash_init command and the load_helper command.
หาก Flash มีการ initialized สำเร็จจะเป็นดังนี้:
switch: flash_init
Initializing Flash...
...The flash is already initialized.
switch:
Initializing Flash...
...The flash is already initialized.
switch:
แต่หาก initialized ไม่สำเร็จ จะเป็นดังนี้
switch: flash_init
Initializing Flash...
flashfs[0]: 21 files, 2 directories
flashfs[0]: 0 orphaned files, 0 orphaned directories
flashfs[0]: Total bytes: 7741440
flashfs[0]: Bytes used: 4499456
flashfs[0]: Bytes available: 3241984
flashfs[0]: flashfs fsck took 7 seconds.
...done initializing flash.
Boot Sector Filesystem (bs:) installed, fsid: 3
Parameter Block Filesystem (pb:) installed, fsid: 4
ใช้คำสั่ง load_helper เพื่อที่จะให้โหลดไฟล์ helper boot image เช่น
switch: load_helper
switch:
switch:
- ใช้คำสั่ง dir flash: เพื่อดูข้อมูลที่อยู่ใน flash: เช่น
switch: dir flash:
Directory of flash:/
2 -rwx 5 <date> private-config.text
3 -rwx 110 <date> info
4 -rwx 976 <date> vlan.dat
6 -rwx 286 <date> env_vars
26 -rwx 1592 <date> config.text
8 drwx 1088 <date> html
19 -rwx 110 <date> info.ver
4393472 bytes available (3347968 bytes used)
switch:
!--- No Cisco IOS images or image directories exist in Flash.
ถ้าหากแสดงคล้ายตัวอย่างด้านบนคือ ไม่มีไฟล์ image (ไฟล์นามสกุล .bin) ให้ทำขั้นตอนที่ 5 คือแก้ไขโดยการโหลดไฟล์เข้าไปใหม่โดยผ่าน Xmodem
หากยังพบไฟล์ image อยู่ใน flash ให้ชั้คำสั่ง boot เพื่อพยายามลองบูทอีกครั้ง ตัวอย่างคำสั่งเช่น
boot flash:filename
เช่น Catalyst 2950
พิมพ์ switch: boot flash:c2950-i6q4l2-mz.121-13.EA1.bin
!--- This example uses the boot flash:<filename>
!--- command on a 2950.
Loading "flash:c2950-i6q4l2-mz.121-13.EA1.bin"...###########
###########################################################
!--- Output suppressed.
!--- This command syntax is the same for Catalyst 2940 and 2955 series
!--- switches.
รุ่นCatalyst 3550
switch: boot flash:c3550-i5q3l2-mz.121-13.EA1/c3550-i5q3l2-mz.121-13.EA1.bin
!--- This example uses the boot flash:<filename>/<directory>
!--- command on a 3550.
Loading "flash:c3550-i5q3l2-mz.121-13.EA1/c3550-i5q3l2-mz.121-13.EA1.bin"...####
################################################################################
!--- Output suppressed.
!--- This command syntax is the same for Catalyst 2970, 3560, and 3750
!--- series switches.
ถ้าใช้ คำสั่ง boot แล้วสำเร็จ prompt จะขึ้นเป็นปกติ คือ switch>
Press RETURN to get started!
Switch>
!--- The bootup was successful.
Switch>
!--- The bootup was successful.
หากไม่สำเร็จ ให้ทำตามขั้นตอนที่ 5 คือการโหลดไฟล์ image ใหม่ ผ่านทาง Xmodem ซึ่งอาจลบไฟล์ image เดิมที่ไม่สมบูรณืออกก่อนก็ได้ โดยใช้คำสั่ง delete เช่น
switch: delete flash:c2950-i6q4l2-mz.121-12c.EA1.bin
!--- Issue the delete flash:<filename>
!--- command in order to delete a Cisco IOS image.
Are you sure you want to delete "flash:c2950-i6q4l2-mz.121-12c.EA1.bin" (y/n)? y
!--- Enter y for yes if you want to delete the image.
File "flash:c2950-i6q4l2-mz.121-12c.EA1.bin" deleted
switch:
!--- Issue the delete flash:<filename>
!--- command in order to delete a Cisco IOS image.
Are you sure you want to delete "flash:c2950-i6q4l2-mz.121-12c.EA1.bin" (y/n)? y
!--- Enter y for yes if you want to delete the image.
File "flash:c2950-i6q4l2-mz.121-12c.EA1.bin" deleted
switch:
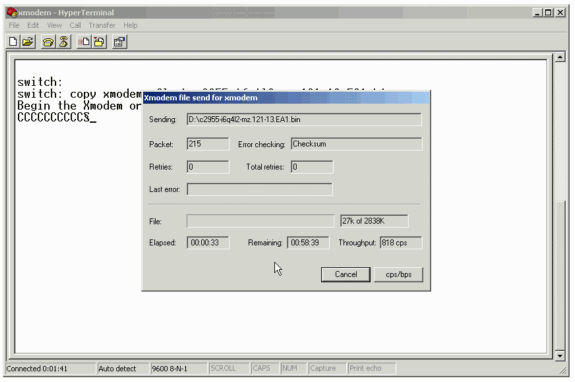
- ตัวอย่างต่อไปคือการใช้ Xmodem จากโปรแกรม HyperTerminal เพื่อโหลดไฟล์ image ไปยัง switch
- คำสั่ง copy xmodem: flash:filename
ตัวอย่างเช่น
switch: copy xmodem: flash:c2955-i6q4l2-mz.121-13.EA1.bin
Begin the Xmodem or Xmodem-1K transfer now...
CCC
Begin the Xmodem or Xmodem-1K transfer now...
CCC
- จากโปรแกรม HyperTerminal เลือก Transfer > Send File.
- ที่ Protocol เลือก Xmodem และในช่อง Filename กดปุ่ม Browse และเลือก ไฟล์ Cisco IOS image (.bin file)
- กดปุ่ม Send
- ระยะเวลาการส่งไฟล์อาจใช้เวลานานขึ้นอยู่กับขนาดของไฟล์ หากสำเร็จจะมีข้อความดังนี้


CCCCCCC.........................................................................
................................................................................
................................................................................
................................................................................
................................................................................
................................................................................
................................................................................
................................................................................
.............................................................................
File "xmodem:" successfully copied to "flash:c2955-i6q4l2-mz.121-13.EA1.bin"
!--- If the Xmodem file transfer fails for some reason, restart the process.
!--- If the Xmodem file transfer is successful, you return to the
!--- switch: prompt.
switch:
................................................................................
................................................................................
................................................................................
................................................................................
................................................................................
................................................................................
................................................................................
.............................................................................
File "xmodem:" successfully copied to "flash:c2955-i6q4l2-mz.121-13.EA1.bin"
!--- If the Xmodem file transfer fails for some reason, restart the process.
!--- If the Xmodem file transfer is successful, you return to the
!--- switch: prompt.
switch:
- หากต้องการระบุไฟล์ที่ต้องการบูท สามารถทำได้ตามตังอย่างดังนี้
boot flash:filename
switch: boot flash:c2955-i6q4l2-mz.121-13.EA1.bin
Loading "flash:c2955-i6q4l2-mz.121-13.EA1.bin"...###############################
################################################################################
!--- Output suppressed.
Press RETURN to get started!
Switch>
!--- The bootup was successful.
Loading "flash:c2955-i6q4l2-mz.121-13.EA1.bin"...###############################
################################################################################
!--- Output suppressed.
Press RETURN to get started!
Switch>
!--- The bootup was successful.
ตรวจสอบความถูกต้องเมื่อขั้นตอนการบูทสมบูรณ์ ด้วยคำสั่ง show version เช่น
2955#show version
Cisco Internetwork Operating System Software
IOS (tm) C2955 Software (C2955-I6Q4L2-M), Version 12.1(13)EA1, RELEASE SOFTWARE
!--- This is the current version of software
Cisco Internetwork Operating System Software
IOS (tm) C2955 Software (C2955-I6Q4L2-M), Version 12.1(13)EA1, RELEASE SOFTWARE
!--- This is the current version of software
